Raaqeb Camera Manual
- Camera Features
- First Time Prerequisites
- Camera Discovery
- Main Screen
- Alerts
- Drawer Menu
- Camera Setting
- App Setting
- Cloud
- Camera Files
- Motion Detection
- YouTube
- Secured Stream
- CCTV
- Camera Update
- About this App
Camera Features
- High resolution Camera, up to 12MP (5MP/8MP/12MP)
- Low latency streaming over the home network (can reach 150 ms)
- Recording the video stream on the android device or the camera
- Upload camera snapshots to Cloud providers (Google Drive & Telegram) allowing the user to view the snapshots directly from the Alerts or notifications bar without the need to connect to the camera
- Live broadcasting via known streaming service providers e.g. YouTube, Facebook, Twitch, Twitter, Vimeo … etc
- No extra/hidden fees for storing on the cloud or the camera
- No limit on camera storage (based on SD card capacity)
- Camera setting is configurable e.g. resolution, bitrate, framerate …
- Based on Raspberry Pi (well known Single Board Computer), you can utilize the hardware for your own DIY projects. Just make sure you keep a copy of the SD card saved for later use as a camera
- Small footprint and USB powered by any power bank
- Configurable Motion detection and zoning options
- Notifications are send to user if motion is detected
- Secured streaming via VPN from Android App directly to the Camera (Camera acts as a streaming and VPN server). Totally private (one-to-one) between the camera/App without any streaming server in the middle
- Camera is based on small computer, hence it’s features are improved with any update
First Time Prerequisites
- Camera will connect at startup to any open WiFi/Hotspot (Security/Encryption: none) without password
- In case open WiFi is not available, the camera itself will act as hotspot and broadcast its SSID (jr-camera-xxxxxx) so that users can connect to it
- Start App
- Cameras will be discovered in the Camera Discovery screen
- You can add later your secured home WiFi network in the upper menu in the Main Screen
- Connecting to your home WiFi is recommended (instead of depending on the camera hotspot) since you can connect to all cameras at the same time. In addition, camera needs your home Internet access for advanced features e.g. notifications, Cloud … etc
- Note: Restart the camera (disconnect it from power supply and reconnect it again) if you missed any step above
*[For Advanced Users] you can change the wifi setting by removing the SD card from the camera and insert it into PC. Modify thewifi.confunder USB devicebootas following:
country=XX
ctrl_interface=DIR=/var/run/wpa_supplicant GROUP=netdev

network={
 freq_list=2412 2417 2422 2427 2432 2437 2442 2447 2452 2457 2462 2467 2472
 key_mgmt=NONE
}

network={
 scan_ssid=1
 ssid="xxx"
 psk="xxx"
 freq_list=2412 2417 2422 2427 2432 2437 2442 2447 2452 2457 2462 2467 2472
 priority=1
}
You need to edit:
- country: you country code e.g. United Arab Emirates is
AE. list of country codes is here - ssid: Wifi SSID Name
- psk: WiFi password
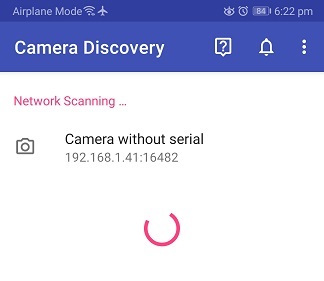
Camera Discovery
- When you start the App, you will see the following screen:

- All cameras connected to this WiFi hotspot will be discovered after short time
- Press any camera to start viewing the stream
Options
- Press
 to re-initiate the discovery and refresh the camera list
 - Press
 to enable CCTV mode
 - In the upper menu

- Alerts: a screen that includes all the notifications and clips that has been stored (in the camera or in Google Drive)
- Reset factory: remove all setting in the app (NOT Camera reset)
- App Setting: Mobile app setting (not the camera)
- Send Feedback: Please send your concerns and suggestions to [email protected]
- Language: You will see العربية to change to Arabic
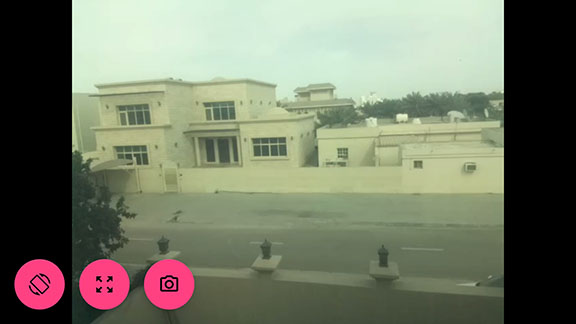
Main Screen
- You will see the following screen once you select a camera:

- Options:
 -> take a snapshot and store it in
 Downloadfolder. You can change the location of snapshots from the App Setting -> store the stream under
 Downloadin the phone and you can change it from the App Setting -> store the stream in the camera (SD card) and you can browse the files from Camera Files in the Drawer Menu
- -> upper menu includes:
- Restart Camera
- Reset to factory: remove all camera setting and return it back as new
- Add WiFi: To start the camera for the first time, you need to connect to open WiFi as mentioned in First Time Prerequisites. In case you need to connect to secured network, you can add this network here
 -> Alerts and it includes all the notifications and clips that has been stored (in the camera or in Google Drive)
 -> change the screen orientation so that stream window is covering the whole screen
 -> zoom out the stream window to its actual resolution (it might be bigger or smaller than the current view), you can return back by pressing
Alerts
- It includes all the clips stored in the camera (SD card) or on the cloud (Google Drive)

- Every clip contains a thumbnail with the camera name, time and detection level
- All clips are stored due to a detected motion which can be configured in Motion Detection from Drawer Menu
- Detection level is calculated based on the motion, bigger means more motion. This number helps you identify the suitable level to configure in Motion Detection
 -> to delete all alerts
- Pressing on any clip will display the stored stream from Google Drive. In case the clip is stored in the camera (SD card):
- You will not be able to see it if you press Alerts from Camera Discovery screen. You need to search for it in Camera Files from Drawer Menu once you connect to that camera
- You will be able to see it if you press Alerts from Main Screen
- You will not be able to see it if you press Alerts from Camera Discovery screen. You need to search for it in Camera Files from Drawer Menu
- Alerts from the Camera Discovery screen will show you all the alerts from all cameras, where Alerts from the Main Screen will show you only alerts related to the connected camera only
- Alerts are delivered to the last phone that accessed the camera (except in viewer mode)
Drawer Menu

Include the following:
Camera Setting
- Includes all camera setting. Do not change it if you do not know them. You can find the details in Raspberry Pi camera documentation


- Password: 4 code number. To disable it, leave it empty
- Name: rename your camera (e.g. by room name)
- Enable Viewer mode: Enable any user to view the stream (for the camera protected by password) without the ability to change anything
- Codec: H264 or MJPEG. It is recommended to keep it to H264 due to its compression efficiency but its resolution is limited to 1080. MJPEG can go up to 3280x2464 but its compression is much less
- Resolution: many options are available. It is recommended to keep it low to 480p especially if you are using it for Cloud
- Exposure: controls the light projected on the camera sensor. Many options are available: auto, night, nightpreview, backlight, spotlight, sports, snow, beach, verylong, fixedfps, antishake, fireworks
- Image Effect (ifx): can change the image with many effects. Many options are available: none, negative, solarise, posterise, sketch, denoise, emboss, oilpaint, hatch, gpen, pastel, watercolour, film, blur, saturation, colorswap, washedout, colorpoint, colorbalance, cartoon


- White Balance (awb): controls white color balance. Many options are available: auto, sunlight, cloudy, shade, tungsten, fluorescent incandescent, flash, horizon
- Rotation: rotate the image. 3 degrees are available: 90, 180, 270
- Quantisation: size of video decreases with the the decrease in the image quality. 4 options available from lowest to highest
- Sharpness: sets the sharpness of the image. 0 is the default
- Contrast: sets the contrast of the image. 0 is the default
- Brightness: sets the brightness of the image. 50 is the default. 0 is black, 100 is white
- Saturation: sets the color saturation of the image. 0 is the default
- Frame Rate: sets the frame rate of the stream
- Bit Rate: bits per second (in Mbps). 0 is variable bitrate
- Shutter: sets the shutter speed to the specified value (in seconds)
- I-Frame: sets the intra refresh period (GoP) rate for the recorded video. H264 video uses a complete frame (I-frame) every intra refresh period, from which subsequent frames are based. This option specifies the number of frames between each I-frame. Larger numbers here will reduce the size of the resulting video, and smaller numbers make the stream less error-prone
- Camera status: enable collecting performance status e.g. CPU/RAM/Temp. Only enable it temporary to troubleshoot based on support request. It will reboot once enabled. You can see the status dashboard from the upper menu or by long pressing the camera in the Camera Discovery screen

App Setting

- Includes the option to display the alerts/notifications in the status bar. Notifications are for the motion detection as configured in Motion Detection. App receives alerts all the time regardless of this option and displayed in Alerts. This option is only to show it in the status bar
- Media Path on Phone: Change the location/folder to save clips on your phone when you:
- take a snapshot
- store on phone
- save clips from camera to phone as explained in Camera Files

- take a snapshot
- Main location is
Downloadfolder. At the same time, all other storage’s will be shown (default internal App folderAndroid/data/com.jarwaniot.raaqeb/filesand external SD cards) - Take a note that App internal folder
Android/data/com.jarwaniot.raaqebwill be removed in case you uninstall JarwanIOT App, hence you will loose all of your clips. To avoid this keep it the default or move it to external SD cards - Press
 to save changes
 - Import VPN certificate: It is used to view the stream from anywhere outside your home. You can share it with all you want them to see the stream. Details will come in Secured Stream
Cloud

- You can upload your clips to Telegram:
- Camera server will store small clips of 30 seconds or 2 MB and then analyze it for Motion Detection. In case of positive analysis, it will upload it to your Telegram Bot that you need to create
- Creating Telegram Bot is easy and known; you need to go in Telegram App to
@BotFather, press/newBot, decide on the name and copy the Token here and enable telegram switch - Password field is optional, up to 4 digits and it will prevent any user to receive the clips/notifications
- Go to your Bot in Telegram App now and press any key to see the menu
- Press /add to register yourself for this Camera to receive clips/notifications
- Every Camera requires different Bot. The Camera itself listen to the Bot and control it
- Camera Telegram Bot can be shared with the last 5 chat_id registered with the notifications (5 people can share and receive the same camera Bot)
- In addition, you can upload your clips to Google Drive. Camera server will store the small clips and upload it to your Google Drive account:
- App will need your permission to store files on your account in Google. you will be forwarded to Google site to grant this access. once approved you can copy the code and paste here
- Press the below lock button
- Enabling this feature will change few camera setting:
- Change resolution to 640x480
- Change framerate to 8fps
- Change codec to H264
- Change bitrate to variable(0)
- Change I-Frame to 30
- Change quantisation to low
- Notes on GDrive, Telegram & Storing on SD:
- All can be active at the same time if Motion Detection is enabled
- GDrive & Telegram will be disabled when Motion Detection is disabled. Storing on SD will continue with warning of SD filling quickly
- Disabling GDrive or Telegram will not disable Storing on SD
- Starting any of GDrive or Telegram will enable Motion Detection by default. In case Storing on SD was enabled, Motion Detection will be enabled as a result as well even if it was disabled before that
Camera Files

- You can enable storing the stream on the camera itself (SD card) by pressing in the Main Screen
- You can browse the files in this screen
- You can delete all files by pressing
- Enabling this feature will change few camera setting:
- Change resolution to 640x480
- Change framerate to 8fps
- Change codec to H264
- Change bitrate to variable(0)
- Change I-Frame to 30
- Change quantisation to low
- SD card contains all files and can be easly mounted on any PC (Windows) or mobile to explore it
- Once SD card is full, all storing and Motion Detection will stop
Motion Detection

- This screen is used to configure the motion detection setting that is used to store the stream locally on the camera or remotely to the cloud provider (Google Drive). By enabling this feature, only clips with motion detected are stored
- Camera is storing stream in a small clips of 30 seconds or 2 MB before applying the motion detection logic
- It is recommended not to change
Time to analyze one image (s)unless you need it since it affects the camera performance - Options:
- Time to analyze one image (s): time period to compare the current image from the previous one. Increasing this number will make the camera more efficient to detect against slow moving objects. Reducing this number will make the camera more efficient against fast objects (e.g. cars)
- Detection Level: calculating the movable size (%) in the current image compared to the previous image. Increasing this number will make the camera more efficient against big objects and reducing it will make it more efficient against small objects (pay attention that reducing it will increase the false alarms resulting from small movement and utilize the internal SD storage)
- Image analysis sensitivity: care about the moving object color deviation from its surrounding. Reducing this number will it easy to detect objects that its color is close to its surrounding (more sensitive, pay attention of false alarms if reduced heavily). Increasing this number will make it efficient to detect only objects that its color is very var from its surrounding e.g. white care against black road
- Zones: specify the area that you want to detect the motion inside it e.g. home/room entrance. the notification in this case will be received if someone enter or leave the room, the rest of the area will not be considered
- It might be difficult to specify these numbers since it changes with the environment (colors, objects, lighting …), hence it is recommended first to try the default setting and check the detection level in the Alerts for every detected clip. it will help you to adjust the numbers as needed
YouTube


- You can broadcast your stream via many streaming service providers including YouTube, Facebook, Twitch, Twitter, Vimeo … etc
- You need to follow the setting needed by every provider as shown in the screenshot. You need first to change these in the Camera Setting and then enable this option here
- Insert the secret key in the {stream_key} part of the URL. Every provider has his own way of providing this key to you
- Once this feature is activated, normal streaming via this App will stop until you disable this feature again
Secured Stream

- One of the most important features, the ability to connect to this camera fully securely from outside
- Most of other cameras that are providing this feature uses the company streaming server in the middle, hence all of your clips are actually saved in the main company server
- This feature prevent saving internal home clips in outside streaming servers (e.g. as in Cloud or Google Drive)
- In this mode the camera works as a streaming/VPN server itself. the communication between the App and camera is direct without any external middle servers
- There are many advantages for this approach e.g. more control on the camera in terms of resolution, low latency (can reach less than 0.5 second via VPN and 150 ms via local WiFi network) …
- At the same time, there are disadvantages for this approach and it needs many prerequisites to be done:
- Generate VPN certificate as show in the above screenshot (just press on it and it will generate it)
- Wait for a moment until you receive a completion notification
- Restart the App, the following screenshot will be displayed:

- Under
Secured Streamyou can see all VPN certifications - You can see the details of the VPN certificate by long pressing it:

- And you can delete it as well or share it
 with other users or download it
  for future use by importing it as explained in App Setting
 - Check the VPN port and put it in your home router (Virtual Servers or Port/NAT Forwarding). For example under any camera you can see something like
udp://192.168.1.44:18068, you need to change your router (Virtual Server setting) as follow:

- Port
18068, you need to put it inExternal PortandInternal Port - Protocol
udp, it is recommended to have bothTCP/UDP - Camera IP
192.168.1.44, you can put it underInternal Server IP - The following Youtube links might help
- Pay attention to the following:
- You cannot use this feature to connect via the same WiFi network that has the camera (your router will block it). You need to connect via another public network (e.g. 3G) or ignore using VPN connectivity and scan locally for your camera
- VPN certificate is expired under these conditions:
- After 1 year
- If the camera
Private IPis changed, this usually happens after camera reboot or your home router reboot. It is recommended to configure very longDHCP leasein the router to avoid this situation - If the router
Public IPis changed, this usually happens after router reboot (or rarely changed from the Internet service provider) - With any change in the VPN setting (e.g. port, protocol)
- If the camera password is changed
- With factory reset
- In these cases you need to regenerate the VPN certificate
- The App will require VPN client installation which is OpenVPN for Android
- There are options to change:
- Protocol: change to
tcpin case of connection disconnects - Port: you will need to change it in case of factory reset (port will change with every reset). In this case, either you change the port in the router to match the new port in the camera or change it here to match the old port
- VPN Encryption: Turn this off if you need to connect more than one user at the same time via VPN, in case the connection is very slow or the resolution is high (requires high bandwidth)
- Protocol: change to
CCTV
-
To enable CCTV, select the cameras that you need to view them in one dashboard (up to 8 cameras) and press

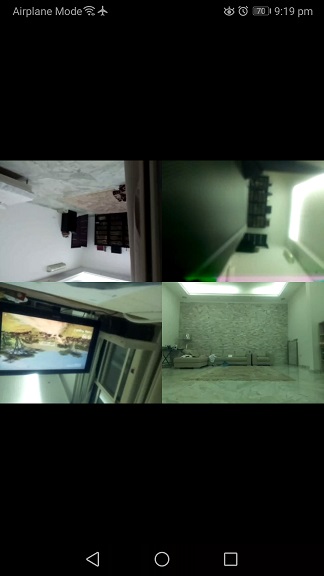
-
Note the following:
- CCTV mode will change the camera setting without notifying the user to:
- Change resolution to 640x480
- Change framerate to 8fps
- Change codec to H264
- Change bitrate to variable(0)
- Change I-Frame to 30
- Change quantisation to low
- In case of live Streaming (YouTube), CCTV dashboard will be black for that camera portion
- CCTV will disable broadcast
- CCTV mode does not check password with the camera. If wrong password provided, CCTV dashboard will be black for that camera portion
- CCTV mode will change the camera setting without notifying the user to:
Camera Update
- App is updated via Google Play. App might display to you the need to upgrade the camera firmware itself
- Camera firmware is on the SD card inside the camera and the update process is as follow:
- Download the latest firmware from JarwanIOT
- The firmware is an
imgfile that needs to be written to the SD card using Win32DiskImager - Insert the SD card again inside the camera and restart it, it will take few minutes and the following screen will be displayed:
- Press on the camera list and provide the camera key (printed on the camera case). Camera will be restarted and new firmware update is finished now
- Important Note: you need to save the printed camera key, you will need it for any failure in the SD card or for any update as explained
- SD card failure is known to everyone, hence the above instructions are important
- It is recommended to purchase SD card
Class 10withWear leveling(e.g. SanDisk) - Minimum size is 4GB
- It is recommended to purchase SD card
- It is recommended to take a copy of the original SD card and save it in your PC using Win32DiskImager. You can later write it down to another SD card without the need to reinsert the camera key again. It is recommended to have the same type and size.
- Camera comes with 16GB SD card. In case you need more capacity for your camera snapshots, you can follow the previous procedure with bigger SD cards e.g. 128GB (or 256GB max)
- Note: SD card contains the OS for the camera as well, it is not only for the files. Camera will not work unless you burn the official image as explained above
About this App
- Currently No iOS App
- نشرت
- 30 أكتوبر 2020
- مشاهدات الصفحة
- 2,582